hexo自动化部署
github action
github action 是一个持续集成(Continuous intergration)和持续交付(Continuous deluvery)的平台,他可以做到自动化构建、测试、部署。

我们可以通过github action的逻辑自动化部署位于git-pages上的个人博客,省去频繁的个人同步的操作。
而且针对其他难以在个人电脑上进行编译的庞大宫成,也可以历史github action提供的runner进行编译。
接下来的内容是我通过github action进行自动化部署hexo个人blog的经验。
依赖准备
针对hexo,我们需要提供必要的md文件,剩余的内容可以通过hexo进行自动生成和部署,具体需要部署的内容是经过了hexo generate之后生成public文件夹。
将生成完成的public文件夹同步到名为${user-name}.github.iogithub工程的master分支后,github会自动将该内容发布到http://${user-name}.github.io的网页上,方便进行查看。
仓库准备
因此,我们至少需要准备两个仓库(或者分支)。
- 存储
public文件夹- 使用
${user-name}.github.io仓库的master分支
- 使用
- 存储md文件源代码和相关配置文件
- 可以使用任务仓库的任意分支
- 我这里使用的是
${user-name}.github.io的source-files分支
配置文件准备
配置文件主要分成网站配置文件和主题配置文件两部分。
- 网站配置文件
- 控制网站基本信息
- 主题配置文件
- 如果你安装了自己的主题的话,会处于
./themes/${theme-name}/下,用来控制主题的相关配置
- 如果你安装了自己的主题的话,会处于
本地文件准备和同步
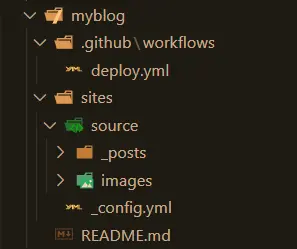
- 准备好本地文件。
具体的文件夹结构可以参考下图:

- 将准备好的文件同步到线上指定的仓库或分支里。
线上github-action的workflow编写
这里是整个部署过程的核心部分,在github-action的运行过程中,我们会集成和Hexo相关的操作,包括hexo clean和hexo generate和主题安装的过程。
目的就是为了将过去我们需要手动处理的流程,全部通过github-action进行自动化处理。
name: Hexo Deploy

on:   # 指定在什么条件下执行当前workflow
  push:   # 在push的时候触发workflow,可选值也包括pull_request
    branches:
      - source-files  # 推送到分支source-files的时候执行当前worklflow

jobs:
  build:
    runs-on: ubuntu-18.04   # 基于ubuntu-18.04执行下述任务
    if: github.event.repository.owner.id == github.event.sender.id  # 只有当推送owner和当前仓库owner一致是运行

    steps:
      - name: Checkout source   # check到source-files分支
        uses: actions/checkout@v2
        with:
          ref: source-files

      - name: Configration hexo repo    # 配置github密钥
        env:
          ACTION_DEPLOY_KEY: ${{ secrets.MY_SECRET }}
        run: |
          mkdir -p ~/.ssh/
          echo "$ACTION_DEPLOY_KEY" > ~/.ssh/id_rsa
          chmod 600 ~/.ssh/id_rsa
          ssh-keyscan github.com >> ~/.ssh/known_hosts
          git config --global user.email "zhang371312@126.com"
          git config --global user.name "ZermZhang"

      - name: Checkout submodules
        run: |
          git submodule init
          git submodule update

      - name: Setup Node.js     # 安装node.js
        uses: actions/setup-node@v1
        with:
          node-version: '12'

      - name: Setup Hexo    # 安装hexo
        run: |
          npm install -g hexo-cli

      - name: Generate files    # 构建hexo博客工程
        run: |
          hexo init myblog
          cd myblog
          npm install
          git clone https://github.com/theme-next/hexo-theme-next themes/next

          cp -r ../sites/* ./
          hexo clean
          hexo generate

      - name: Deploy hexo blog    # 将生成的工程文件上传到master分支
        env:
          # Github 仓库
          GITHUB_REPO: github.com/${user-name}/${user-name}.github.io
        # 将编译后的博客文件推送到指定仓库
        run: |
          ls
          cd ./myblog/public && git init && git add .
          git config user.name "${user-name}"
          git config user.email "${user-mail}"
          git add .
          git commit -m "GitHub Actions Auto Builder at $(date +'%Y-%m-%d %H:%M:%S')"
git push --force --quiet "https://${{ secrets.MY_SECRET }}@$GITHUB_REPO" master:masterhexo自动化部署
https://zermzhang.github.io/2022/04/19/blog/hexo自动化部署/